# HTML Structure
This is the base structure for an HTML page:
<!DOCTYPE html>
<html lang="en-US">
	<head>
		<meta charset="utf-8" />
		<meta name="viewport" content="width=device-width, initial-scale=1.0" />
		<title>Mi test site</title>
		<link rel="icon" href="favicon.ico">
		<linl rel="stylesheet" href="styles.css">
	</head>
	<body>
		<p>This is my page</p>
	</body>
</html>
In order to keep visual order, it is very important to indent every time we nest a tag inside another. We can think about parents nesting children.
<!DOCTYPE html> is a tag that must be included in every HTML document so that it can be validated. It is located at the beginning of the page.
<html></html> is the element that nests all the content of the page. It is known as the root element. The lang attribute is to tell the browser what language the content is in.
<head></head> this element acts as a container for all the parameters we want to include in HTML that won’t be visible to the site's visitor. It includes key words and the site description that will appear in searches (SEO), as well as the style sheet that will be used to provide format to our site, and also the meta elements, that provides metadata that can't be expressed with other elements in the head, for example:
<meta charset="utf-8">establishes that our HTML document will use theUTF-8, that includes most of the characters of all languages.<meta name="viewport" content="width=device-width, initial-scale=1.0">it is wise to include this line if we want our sites to be responsive.<title></title>is the title of the document that appears on the navigation tab when the site loads. Also when a user saves your site in their bookmarks.<link rel="icon" href="favicon.ico">this line is useful if we want to add a favicon to our site.<linl rel="stylesheet" href="styles.css">this line is an example of how to link your style sheets in your site.<body></body>tag will nest all the visible content that you want to show to the users when visiting your site.
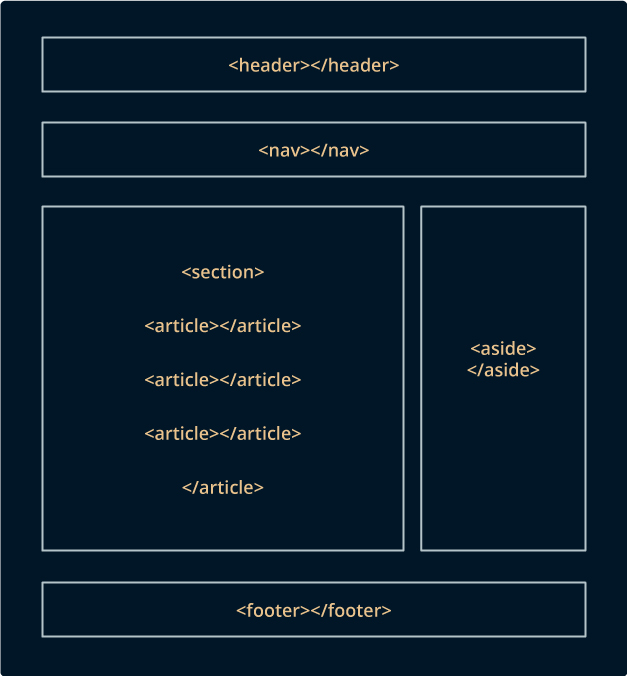
There ara some common tags to structure the <body> of an HTML page. Here we will show an example of a layout:
<body>
	<header>Header</header>
	<nav>Header</nav>
	<section>
		<article>Article</article>
		<article>Article</article>
		<article>Article</article>
	</section>
	<aside>Aside</aside>
	<footer>Footer</footer>
</body>
<section>Defines a section inside a document.<nav>Defines a section that contains the navigation links, for example the main menu.<article>Defines content that could exist independently from the rest.<aside>Defines content vaguely related to the rest of the page.<main>Defines the main or the most important content of the document. There only has to be one<main>element per document.<header>Defines the header of a page or a section.<footer>Defines the footer of a page or a section.
TIP
You can replace any of these tags with a <div> but is good practice to use semantic tags. Try not to use a div when there is a better semantic way to wrap your content.
For further reading on semantic HTML (opens new window)
This is a draft image of the layout above after adding some CSS:
# Favicon
Favicon is the image shown in the tab of the open page from your browser and also in the favorite panel once you save a site in that list. In order to do that, save the favicon in the same directory as the index.html of our site, use .ico format (most of the browsers admit favicon in other formats such as .gif, .png, .svg, but using .ico will ensure that it will work in older browsers).
Example of a favicon generator site (opens new window)
# Exercise:
- Create a document in the text editor
- Name it index.html
- Copy the html structure shown before
- Edit the title
- Inside the body add a
<h1>with some text for your first title and a<p>that includes astrongtext inside - Save and open in the browser