# DOM and Events
# What is the DOM?
The DOM (Document Object Model) is a structured and hierarchical representation of an HTML document, which allows programmers to access and manipulate the elements and content of a web page dynamically using JavaScript.
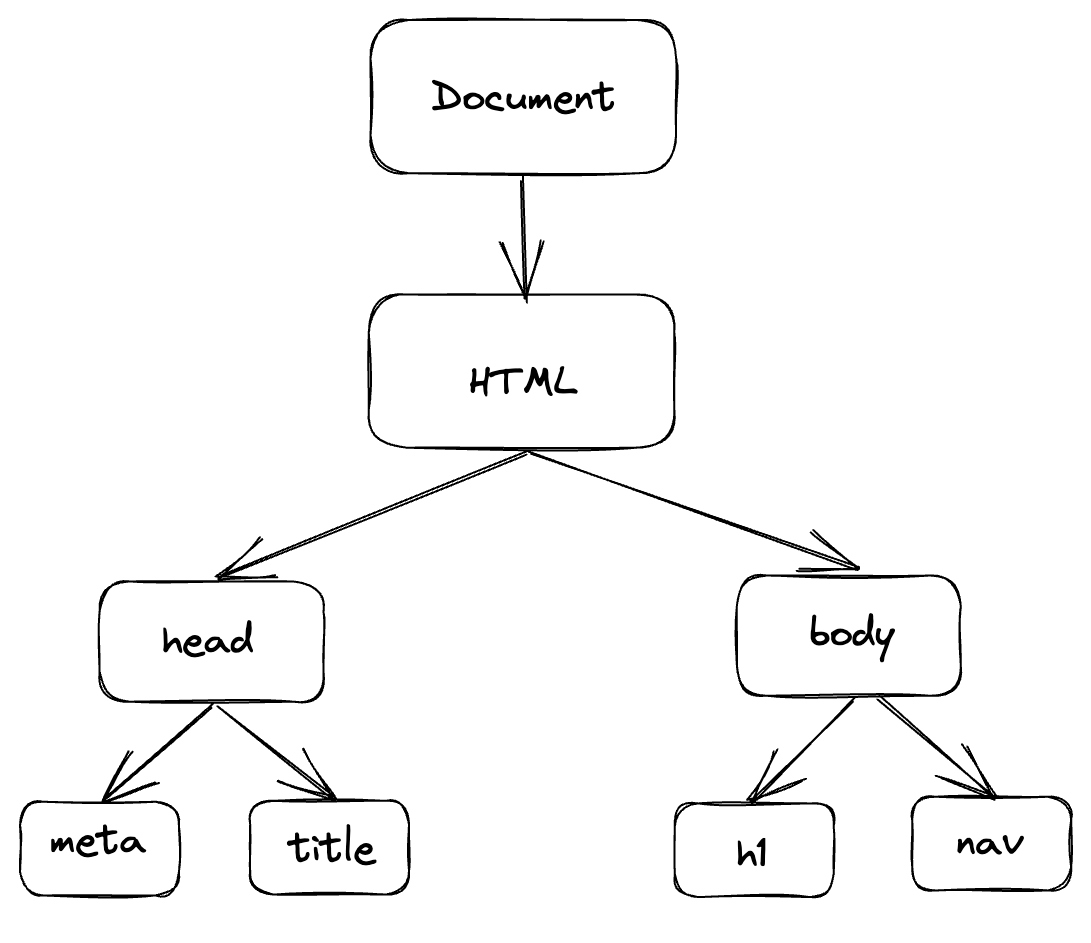
The DOM views an HTML document as a tree of nodes and a node represents an HTML element.
Let's take a look at a generic HTML Document auto generated by Visual Studio Code
<!DOCTYPE html>
<html lang="en">
  <head>
    <meta charset="UTF-8" />
    <meta http-equiv="X-UA-Compatible" content="IE=edge" />
    <meta name="viewport" content="width=device-width, initial-scale=1.0" />
    <title>Document</title>
  </head>
  <body></body>
</html>
Our document is called the root node and contains one child node which is the html element. The html element contains two children which are the head and body elements. Both head and body elements could and probably will have children of their own so we can visualize it as the following tree of nodes.

# Manipulating the DOM
DOM manipulation in javascript is an important factor while creating a web application using HTML and JavaScript. It is the process of interacting with the DOM API to change or modify an HTML document. This HTML document can be changed to add or remove elements, update existing elements, rearrange existing elements, etc. The benefit of it is that we can update any data without refreshing the page. Throughout the document, items can be deleted, moved, or rearranged.
# How to select elements
In order to change or modify the DOM, first thing to do would be to grab the corresponding element. At the moment, Javascript provides us 6 different ways to do it.
- getElementById
- getElementsByTagName
- getElementsByClassName
- getElementsByName
- querySelector
- querySelectorAll
Today we will be focusing on only 3 of this methods which are commonly used the most getElementById, querySelector and querySelectorAll
# getElementById
In HTML, ids are used as unique identifiers for the HTML elements. This means you cannot have the same id name for two different elements. By using this method we can grab an HTML tag by referencing the id name. Lets see the following example:
const leni = document.getElementById("leni");
console.log(leni);
This code tells the browser to grab the element with the id of “leni” and print it out to the console. So the result would be the following:

# querySelector
In my personal experience this is the one I’ve used the most. You can use this method to find elements with one or more CSS selectors. Lets create a simple h1 header and a list of topics that we will learn throughout this Bootcamp.
<h1>Lenio Bootcamp 2023</h1>
<ul class="list">
  <li>
    <a href="#">Git</a>
  </li>
  <li>
    <a href="#">HTML</a>
  </li>
  <li>
    <a href="#">JavaScript</a>
  </li>
  <li>
    <a href="#">React</a>
  </li>
</ul>
By using the querySelector method we can pick any of the elements from the DOM, just by providing the corresponding CSS selector. For example, let's log into the console the result of using the “h1” selector which should bring us back the first h1 (the only one in this case).
const h1 = document.querySelector("h1");
console.log(h1);

As a task, you can try to grab the first li element and then tell us how it went.
# querySelectorAll
This method finds all of the elements that match the CSS selector and returns a list of all of those nodes.
# How to create new elements
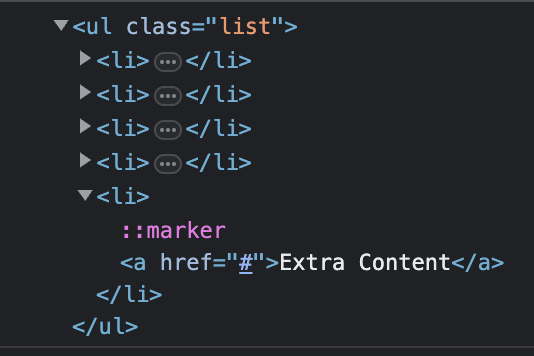
We can use the document.createElement() to add new elements to the DOM tree. From the code example above, let's see how we can add a new topic to the list. The document.createElement() returns a new Node with the Element type and it takes an HTML tag name as a parameter. We should first create an a element, add the text content. Then create an li element to append the a and finally we should be able to append our new element to the list.
// 1. Create the <a> element
const newContentA = document.createElement("a");

// 2. Text content and href
newContentA.textContent = "Extra content";
newContentA.href = "#";

// 3. Create the <li> and append the <a>
const newContentLi = document.createElement("li");
newContentLi.appendChild(newContentA);

// 4. Append the <li> to the list
const list = document.querySelector(".list");
list.appendChild(newContentLi);

// 5. Log the result
console.log(list);

# Events
DOM Events allows JavaScript to add event listeners or event handlers to HTML elements. An event can be something the browser does or a user does.
Examples of events:
- An HTML button was clicked.
- An HTML input field was changed.
- An HTML web page has finished loading.
It is very common that when an event happens, we want to do something. So JavaScript lets us execute code when an event is detected.
In this HTML example onclick is the event listener, myFunction is the event handler
<button onclick="myFunction()">Click me</button>
And in this JavaScript example click is the event and myFunction is the event handler:
button.addEventListener("click", myFunction);
On click is only one of the HTML events, however the list is much longer. For the full list please refer to this list (opens new window)
# Attach events
# addEventListener
This method attaches an event handler to the specified element without overwriting any existing event handlers. Which means we can add many event handlers to a single element. Let's take a look at the syntax.
element.addEventListener(event, function, capture);
The first parameter is the type of the event, like click or any other HTML DOM Event that we have seen. Second parameter is the function that we want to call as soon as the event is detected. The third parameter is a boolean to specify whether to use event bubbling or event capturing and its optional.
Let’s see how to add an event listener to a button and alert the user with a simple “Welcome to Lenio Bootcamp 2023” as soon as the user clicks on a button.
// 1. Capture the element we want to add the listener to
const button = document.getElementById("alert-button");

// 2. Define the function we want to execute
const alertUser = () => {
  alert("Welcome to Lenio Bootcamp 2023");
};

// 3. Attach the event handler
button.addEventListener("click", alertUser);
# Event bubbling and capturing
There are two ways of event propagation in the HTML DOM, bubbling and capturing.
Event propagation is a way of defining the element order when an event occurs. If you have a p element inside a div element, and the user clicks on the p element, which element's "click" event should be handled first?
In bubbling the inner most element's event is handled first and then the outer: the p element's click event is handled first, then the div element's click event.
In capturing the outer most element's event is handled first and then the inner: the div element's click event will be handled first, then the p element's click event.
# Remove events
# removeEventListener
This method, as the name suggests, removes event handlers that have been attached with the addEventListener() method.
element.removeEventListener(event, function, capture);